http://myopicsquid.blogspot.ca/p/foxyform-functiond-t-var-g-d.html

Showing posts with label storage. Show all posts

Monday, March 24, 2014

Lofty Dreams for a New Apartment: The Livingroom

So as I mentioned awhile ago, Ikea is killing off their EXPEDIT line of shelving. They are replacing it with a similar model apparently, but I digress: it's time to snap up some EXPEDIT before it's gone for good. I am one of the masses of people who want the shelf for vinyl storage. The interior is the perfect size for it, and I'm just in love with two of the models in particular:

EXPEDIT on casters58 5/8x32 5/8"
Honestly, when I see this unit I think more "TV stand" than "home of vinyl", with alternating cubes filled with baskets for storage.
EXPEDIT 17 3/8x72 7/8"
I'm leaning towards this one, only because I have wicked plans for it. Picture it horizontally, set on tall (12"? Higher?) legs, and pistachio green with an off-white interior. Yes.

Alexis Sofa via Sears
I really love with the colour of this sofa, and I dig the shape of it too. It looks great with those floral throw pillows, so I'd probably try to dig out some of my vintage bed sheets to re-purpose into pillows for it. Or else I'd screen print a couple of my own designs on to some plain ones. I'm all about the decorative pillows.
Flannigan Sofa via Sears
Not too crazy about the colour of this guy, but I really love the shape. The rounded arms are awesome, and I adore the back.
Indoor/outdoor Chevron Rugs via Target
Floral, Fretwork, and Rugby Stripe Rugs via Target
Apparently my Target addiction rivals my Ikea addiction, at least when it comes to rugs.They have some pretty fantastic ones though! I want to keep my living room area bright and full of energy (which, I know, is a complete contrast to the look I want in my bedroom) but I'm weary of growing tired of patterned furniture, though I do think it can look pretty amazing. I think the easiest solution is to add in my patterns with items that are removable, like throw rugs. I hope wherever I end up there aren't any carpets. Not only would that kill my fun (ha!) but carpets really do a number on my asthma. Yuck.

"Tray" Chic, Ace, and Lattice accent tables via Urban Barn 
Holy punch of colour batman! I adore all three of these tables from Urban Barn. If I could find a way to stick them all in my living room without it looking ridiculous I totally would. I just adore all three of them. I like the fact that the orange one has a removable tray top, which makes serving snacks and cleaning up after a get-together a breeze. Besides the colour, the yellow one is  really neat looking. I'm a sucker for anything with character. And finally, the lattice on the blue one is super cute. I would probably stuff it with string lights and get a pillow for the top so I could use it as a stool to pull up when more seats are needed.

I never used to like the style of modern furniture, but lately that's been changing. One thing I don;t think will ever change is how I could spend all year pouring over furniture and dreaming up room designs. I actually really enjoy planning things out, and putting together a room. Perhaps I should start looking into interior design, ha!


facebookTumblrinstagramGoogle+ShopPinterest


currently listening to: School's Out by Van Halen

Friday, March 21, 2014

Favourite Things Friday #15

Trying some of these!
I knew about re-growing shallots, but I didn't know about most of these! I'm currently testing out celery with success!
GOTTGÖRA Tealight Lantern via Ikea
Look how adorable this is! The colour is gorgeous.

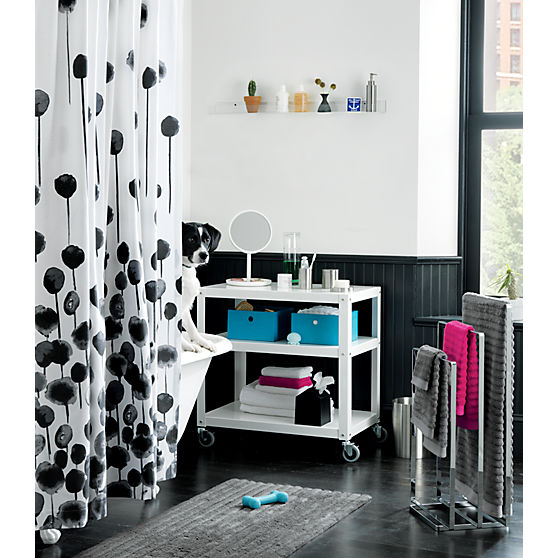
Go-Cart Three-Shelf Table via CB2
How awesome is this cart? It's easily movable, the perfect size for storing vanity supplies or for turning into a bar or tea and coffee cart. Love it.


Oh my word, I would model a room around this baby in a heartbeat!

This print by Danny Brito
I adore everything about this: the colours, the typography, the message, the whole she-bang!


facebookTumblrinstagramGoogle+ShopPinterest


currently listening to: Rumours by Fleetwood Mac

Tuesday, August 27, 2013

DIY "Soup Can" Studio Organization (Part I )

SO! I have been procrastinating with this post because I haven't gotten this project done. I figured splitting it up wouldn't be a bad idea since I haven't quite figured out how I'm mounting my cans yet. It doesn't matter too much because I'm not finished collecting and painting them. Here's what I've been up to so far:


You're going to want to start out with some (clean!) cans. The clean part might seem obvious, but if there's any residue left in or on the cans (from the label glue for example) it will leave a bumpy mess on parts of your can. If you're like me and you don't care too much about having a bumpy patch, by all means spray right over it. I'm planning on mounting my cans with the glue parts facing in so you won't see the bumps anyway (I hope). I thought about using a glue gun to polka-dot my cans and leave intentional bumps to be sprayed over, but I didn't get around to it.

I'm using a dog and cat food can, but a variety of sizes would lend a more interesting look and can store other objects than just the writing utensils and paint brushes I'm planning on using them for. Coffee cans would be great for wool I think!

If you're having trouble getting the glue off your cans, a dab of peanut butter spread over the sticky areas works wonders. Let it sit overnight or longer, and wash with warm soapy water. If you're allergic to peanut butter, oils should work too. The only oil I've tried so far is olive oil and it took longer than the peanut butter, but still did the trick. Boiling water sometimes melts the glue off, or you could always go with a commercial residue remover like Goo Gone. I just like keeping things as natural and simple as possible. (If you have any other ways of removing sticky residue let me know!)


Once again I'm using Krylon's "Pistachio" Spray Paint. I am in love with this colour, and it dries really quickly. You can do your second coat after 10 minutes. Just make sure to do it within an hour or else you're have to wait 24 hours for it to fully dry and cure before adding another coat. If you do it after an hour this might happen. Not fun. Every brand is different of course, so remember to read your can!


I know I'm just sounding naggy now, but please do this in a super well ventilated area, preferably outside. And cover up anything important around you. Wind will take the spray and paint things that have no business being painted. Yes, this is spoken from experience. Yes this is also common sense but I have made this mistake and I'm half hoping I'm not the only one who would do it. Gloves are a good an excellent idea if you want to avoid morphing into a smurf or something worse, as is a mask or bandanna to cover your nose and mouth. If you do get paint on your skin, nail polish remover should take it off, but mineral spirits work best. Soap doesn't do much of anything. 

Spray your cans in short strokes, overlapping each stroke as you move around the can to get an even coverage. I find it easiest to stick a gloved hand inside the can and spray from the mouth of the can to the bottom, rotating as I go. Hold the can several inches away when spraying. If you get too close too much paint will be on the metal and it will run and leave streaks when drying. Once you've covered your can, set it upright to dry for ten minutes. If you're adding another coat, do it within 10-60 minutes.

I left my cans out overnight to dry
To spray the inside, I left my cans upright and sprayed in, rotating the cans as I went. I might spray the inside a different colour to make things more interesting if I ever do this project again.


And that's all for now! Let your cans dry for 24 hours and you're good to go. I finished mine off with a clear varnish spray from Krylon just for some extra protection, but that's definitely optional. Enjoy your pretty recycled storage!

I discovered that in the inspiration shot I found, each can is nailed into the wall individually, but that isn't going to fly in my apartment. I'm planning on mounting mine on some kind of board so I can just stick one nail in the wall (or better yet, prop it up on a table against the wall). Stick around for my post on that!

Stay Scary,
Berlyn

Monday, August 19, 2013

My Spray Paint Addiction

Thanks to Kate Gabrielle (Scathingly Brilliant) I have developed a spray paint addiction (Thanks Kate!)
I am now going broke because I'm spray painting everything I own, and I don't regret it!

The first thing on my list was some form of storage for my pens, brushes, markers and whatnot. I saw this image floating around and decided I had to attempt to make my own.

Found on Imgfave
Super cute right? I wasn't a fan of these particular colours but, as Kate said "as long as there is paint on this planet it doesn't matter." Which resulted in the beginnings of my own recycled can organizer. I'll be sharing my progress later this week.

There wasn't a huge selection, but I love these two!

I took Kate's philosophy and applied to the rest of my stuff too. I picked up two cans of Krylon at Walmart on a whim a couple weeks ago after reading her post. I love personalizing things. It makes my stuff feel like mine, and I'm always happier when everything in my personal area is up to my visual standards. I rarely find furniture or other items in colours I like, and for the longest time my bedroom set was just white. Which can be beautiful in a properly decorated space, but it just bored me to tears. To the point where I wrote all over it in sharpie when I was fifteen. I can't wait to spruce it up in a couple weeks... And get rid of my graffiti. Though the doodle of Jack from The Nightmare Before Christmas might be allowed to stay haha.

In the meantime, I'm sticking to having some fun with the supplies I use for packing orders. I want a portable order packing kit so I can just grab it and go when I need to. I picked up two of these baskets at the dollar store hoping my supplies would fit. They weren't an awful colour to begin with, but I have a colour scheme in mind for my future studio/office space and I want everything to fit in with it. They, along with some office supplies, were treated to a mini makeover, and I love how they look now.

The Pistachio is close to the actual colour, but I overexposed the Gum Drop stuff... it's much more purple in person

I also decided to makeover a drawer tower I've been storing my bathroom stuff (read: nail polish and hair products. Yes I really had enough to fill 3 drawers) in. I'd like to switch its currant contents with some of my art supplies, so I decided to purple-ify it as well. Unfortunately I waited just a little too long in between coats and part of the paint bubbled up. I'm thinking of decoupaging over that area instead of stripping it and repainting.

Berlyn, pay attention to your exposure, yeesh!
And there you have it! All of this is, of course, getting done because of my excitement over the apartment. I'm going to have to get more spraypaint and go nuts with everything else I own now. I'll be posting my progress in the weeks to come. I can't wait to share some photos of it all set up in the new place!

Stay Scary,
Berlyn
Related Posts Plugin for WordPress, Blogger...